Physical Address
Timertau, Pr. Respubliki 19, kv 10
Physical Address
Timertau, Pr. Respubliki 19, kv 10

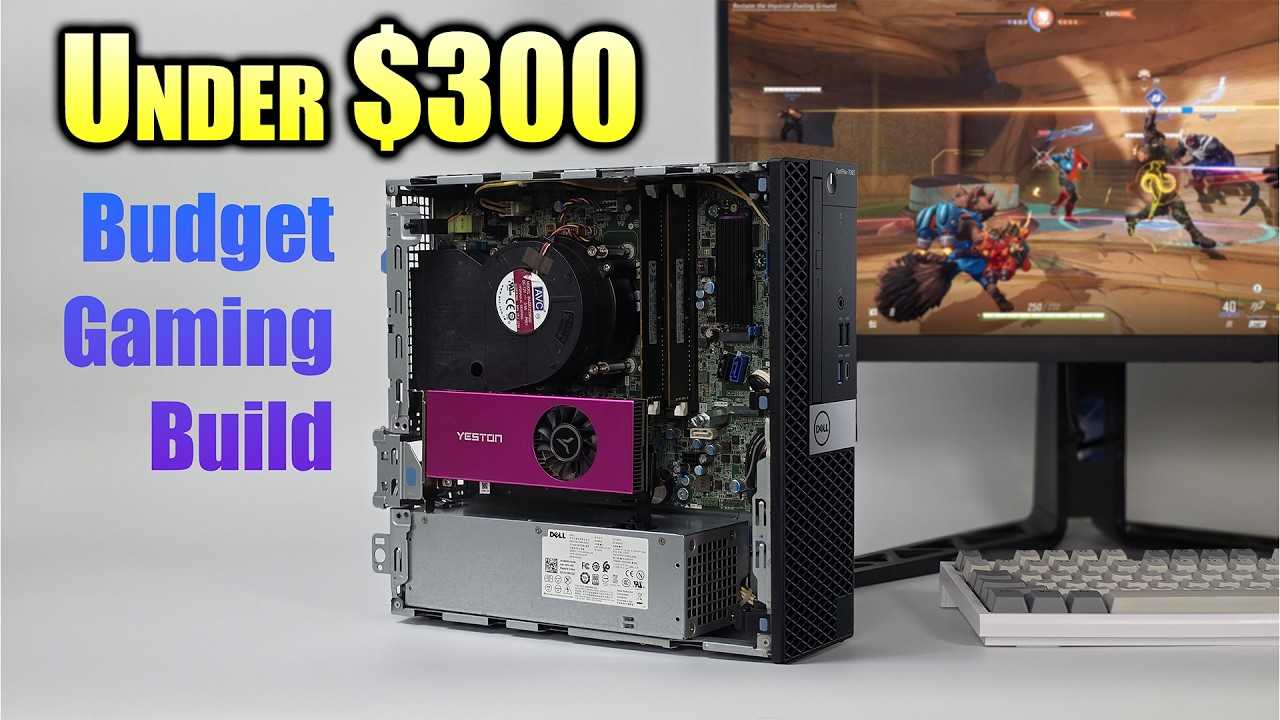
When it comes to maximizing your gaming potential without breaking the bank, finding an affordable activation option for the latest operating system is essential. Whether you’re piecing together a low-cost rig or upgrading an existing setup, having the right software is critical. This cheap guide aims to simplify the process of securing an effective Windows 11 gaming key suited for your financial constraints.
Your purchasing strategy matters significantly, especially if you’re aiming for a solid performance during intense gaming sessions. It’s important to identify the best options available that align with both your needs and your wallet. From limited-time discounts to reputable vendors, you can navigate the terrain of activation codes with ease and confidence, turning your budget purchase into a worthwhile investment.
With the proper insights and strategies at hand, you’ll be ready to enhance your gaming experience seamlessly. Stay tuned for the steps and valuable tips that will take your set-up from ordinary to extraordinary without the hefty price tag. Let’s get started!

The most common types are Retail, OEM, and Volume licenses. Each is tailored to specific needs, so let’s break them down:
| License Type | Description | Best For |
|---|---|---|
| Retail | Purchased directly from authorized sellers. Fully transferable and includes support. | Individuals seeking flexibility and customer support. |
| OEM | Associated with new hardware and tied to a single machine. Limited support from Microsoft. | Building a new rig with cost as a priority. |
| Volume | For businesses; allows multiple activations. Centralized management and deployment tools. | Organizations needing efficiency across numerous devices. |
For a thrifty acquisition, the OEM option generally emerges as a winner. It’s ideal if you’re assembling a system, offering significant savings without sacrificing performance. Just ensure your components are compatible and you’re ready for freshness!
Keep in mind that a legitimate and authentic software suite enhances security and stability while gaming or multitasking. Exploring various sources may lead to a cheap guide on the best deals without compromising quality.
Whichever route you decide to take, understanding license types can lead to a savvy purchase, making your experience enjoyable without breaking the bank.
Finding cost-effective activation codes online can be tricky but not impossible. Many vendors offer competitive prices, helping you to secure a legitimate license without breaking the bank. Below you’ll find a cheap guide to discovering reliable sources for your next great deal.
Start by checking platforms like SoftwareKeep or other similar websites that specialize in software sales. These platforms often have discounts and promotions on their products, making them a go-to for savvy shoppers.
Another option includes visiting official reseller websites. Companies frequently provide authorized sellers with promotional pricing. This helps ensure that your purchase remains keyverified and legitimate.
Moreover, don’t overlook large e-commerce sites such as Amazon and eBay. However, exercise caution here; confirm seller ratings and reviews to avoid purchasing invalid codes. Look for listings that display clear guarantees or return policies to protect your transaction.
Social media groups and forums can also be beneficial. Many communities focus on tech products, where users share their experiences with certain vendors. Engaging with these groups can lead you to affordable offers.
| Platform | Discounts Offered | Key Verification |
|---|---|---|
| SoftwareKeep | Up to 30% off | Yes |
| Official Resellers | Varies | Yes |
| eBay | Up to 50% off | Caution advised |
| Social Media Groups | Community-shared discounts | Variable |
Staying informed about promotions or limited-time offers can greatly enhance your chances of landing a fantastic deal. Monitor various sources regularly since prices fluctuate and discounts can appear unexpectedly. With a bit of effort, you can successfully find quality software at a reasonable price. Happy shopping!
Begin your evaluation by checking reviews and ratings on independent platforms. User feedback serves as a powerful indicator of a dealer’s reliability. Reputable vendors will showcase transparent information regarding sources for their offerings. Be wary of exceptionally low prices, which can signal possible risks, including compromised software licensing.
Next, examine the seller’s return policy. Genuine sellers typically provide user support and guarantees, allowing customers a clear path for recourse in case of issues. For significant discounts, ensure there’s a trustworthy customer service channel available.
Additionally, consider enabling two-factor authentication (2FA) with your account when you purchase your activation method. This layer of security can help protect against unauthorized access, particularly in the event that a third-party vendor falls short in safeguarding your data.
Before finalizing any purchase, look for any signs that the software is tied to a specific device or hardware. Activation keys meant for large-scale deployment may not work properly on personal systems, which could complicate use for casual gamers.
In summary, taking these steps will help ensure that your acquisition is reliable and supports your gaming needs effectively. Remember, investing wisely in a verified product not only secures your current setup but also enriches your overall digital experience.
| Criteria | Indicators of Legitimacy |
|---|---|
| Vendor Reputation | Positive user reviews on multiple platforms |
| Pricing | Consistent with market rates (keyverified) |
| Return Policy | Clear and fair terms |
| Customer Support | Accessible and responsive |
Installing the latest version of this operating system can be straightforward, even for newcomers. Follow this detailed method and transform your low-cost rig into a competent machine effortlessly. Let’s make sure you’re all set to go with the steps below.
Step 1: Preparing Installation Media
You’ll need a USB drive (at least 8GB) to create your installation media. Download the Media Creation Tool from the official website. Run it and select “Create installation media for another PC.” Choose the language, edition, and architecture (64-bit). Finally, insert your USB drive and let the tool craft your bootable media.
Step 2: BIOS Configuration
Restart your computer and enter the BIOS/UEFI settings (usually by hitting F2, F10, or Del during startup). Locate the “Boot” tab, prioritize USB drives, and enable Secure Boot and UEFI mode if available. Save changes and exit.
Step 3: Starting Installation
With the USB inserted, boot your machine. The installation process will commence; select your language preferences and click “Next.” Choose “Install now” to begin the setup. If prompted, enter your verified product key. If you do not have one, you can select “I don’t have a product key” and proceed to set up a budget purchase later.
Step 4: Selecting Installation Type
You will be asked to choose between “Upgrade” or “Custom” installation. For a fresh start on your system, select “Custom.” This option lets you format your existing partitions, ensuring no remnants of the prior OS remain.
Step 5: Partitioning Drives
Choose the primary drive where you want the OS installed. If you’re reformatting, delete the existing partitions until you have unallocated space. Select that space and click “Next.” The system will create the necessary partitions and initiate the installation process.
Step 6: Completing Setup
After the files are installed, the system will restart several times. Follow on-screen prompts to customize your settings, such as account setup and privacy preferences. Selecting a Microsoft account can help sync your settings across devices.
Step 7: Final Touches
Upon completion, make sure to download the latest drivers for your hardware. Use the device manager to check for any missing drivers. This step enhances performance and resolves compatibility issues.
Installation Overview Table
| Step | Action |
|---|---|
| 1 | Create Installation Media |
| 2 | Configure BIOS Settings |
| 3 | Start the Installation |
| 4 | Select Installation Type |
| 5 | Partition Drives |
| 6 | Complete Setup |
| 7 | Update Drivers |
For additional support, check the official Microsoft support page at support.microsoft.com. This resource will ensure you have access to the latest guides and troubleshooting techniques tailored to this system.
Now, you have a streamlined installation process at your fingertips! Navigate through each step with confidence, and soon you’ll be enjoying the latest features that enhance your computing experience.
Happy installation!
| Setting | Action |
|---|---|
| GPU Scheduling | Enable in Graphics Settings |
| Game Mode | Activate in Gaming Settings |
| Power Plan | Set to High Performance |
| Visual Effects | Adjust for Best Performance |
Next, ensure your drivers are up-to-date, particularly your graphics drivers. This can result in enhanced compatibility and optimization with new titles. You can also consider adjusting the resolution and graphics settings within each game for the best performance tailored to your capabilities.
For those ready to dig deeper, here are a few advanced settings to consider:
Achieving optimal efficiency on a frugal setup is possible through conscientious adjustments and settings management. By following this inexpensive guide and utilizing the keyverified approach, you can enhance your system’s functionality without breaking the bank.
For an excellent, value-focused experience, don’t overlook securing a windows 11 gaming key to unlock more features and ensure your system operates at its maximum potential.


