Physical Address
Timertau, Pr. Respubliki 19, kv 10
Physical Address
Timertau, Pr. Respubliki 19, kv 10


For enthusiasts looking to enhance their desktop setup, the transition to the latest operating systems can significantly impact performance and usability. When setting up a powerful rig, ensuring your system is fully licensed and compliant is crucial. The process of software registration can seem daunting, but with the right tools and resources, it can be seamless and hassle-free.
Utilizing reliable online platforms, such as softwarekeep, can simplify obtaining a valid license key for the sophisticated environment you aspire to build. As digital licensing continues to evolve, it is essential to stay updated on the most effective ways to manage software installations and activations. This is particularly important as new features improve overall stability and performance, equipping users with a smoother experience.
Exploring methods for windows 11 silent gaming activation is beneficial not only for performance gains but also for the security benefits associated with legitimate software use. Understanding the nuances of software compliance can ultimately save time and enhance gameplay, allowing users to focus on what truly matters: the game itself.
The processor should be at least 1 GHz with a minimum of dual cores on a compatible 64-bit chipset. This requirement ensures adequate performance during resource-intensive tasks.
RAM capacity must not be less than 4 GB, enabling the efficient handling of multiple applications without degradation in speed or responsiveness.
Additionally, the system must include a minimum of 64 GB of storage space. This is vital for accommodating the operating system and future updates.
Another critical aspect is the DirectX 12 compatible graphics with a WDDM 2.0 driver. This ensures that visual outputs are rendered smoothly, which is particularly important for immersive experiences.
The display needs to have at least a resolution of 720p (1280 x 720) to properly utilize the graphical user interface.
Furthermore, a UEFI firmware with Secure Boot capability is mandatory. This feature enhances security, ensuring that only trusted software can load during the system startup.
To keep track of the updates and any changes related to the softwarekeep guidelines, regularly checking Microsoft’s official resources will provide the best insights into system requirements and compatibility updates.
Lastly, for seamless installation, make sure that your device has internet access for any necessary online verification and updates during the setup process.
One option is to purchase directly from authorized retailers or the official Microsoft site, where the price for the Pro edition often starts around $199. This ensures that you receive a legitimate key that is supported and verified by the manufacturer, preventing potential issues related to counterfeit software.
Alternatively, there are various online marketplaces where valid keys can be sourced at competitive prices. Websites like scdkey.com frequently offer substantial discounts, with keys sometimes available for as low as $20 for previous versions. It is critical to confirm the reliability of these sites by checking user reviews and ratings prior to making a purchase.
For users considering upgrades from older versions, recognize that some keys may be compatible across different editions. Check sources like softwarekeep for additional guidance on compatibility and upgrade options, which can save both time and money.
Lastly, when acquiring your product key, ensure that the vendor provides clear return and support policies. This will not only enhance your experience but also safeguard your investment in creating an optimal computing environment.
1. Prepare Your System
Ensure your computer meets the minimum system requirements for Windows 11. This includes a compatible 64-bit processor, 4 GB RAM, and 64 GB storage. Check the UEFI settings to make sure Secure Boot and TPM 2.0 are enabled.
2. Obtain a Valid Key
Purchase a legitimate product key from trusted marketplaces such as scdkey.com or G2A.com. Avoid unauthorized sellers to prevent issues during the activation.
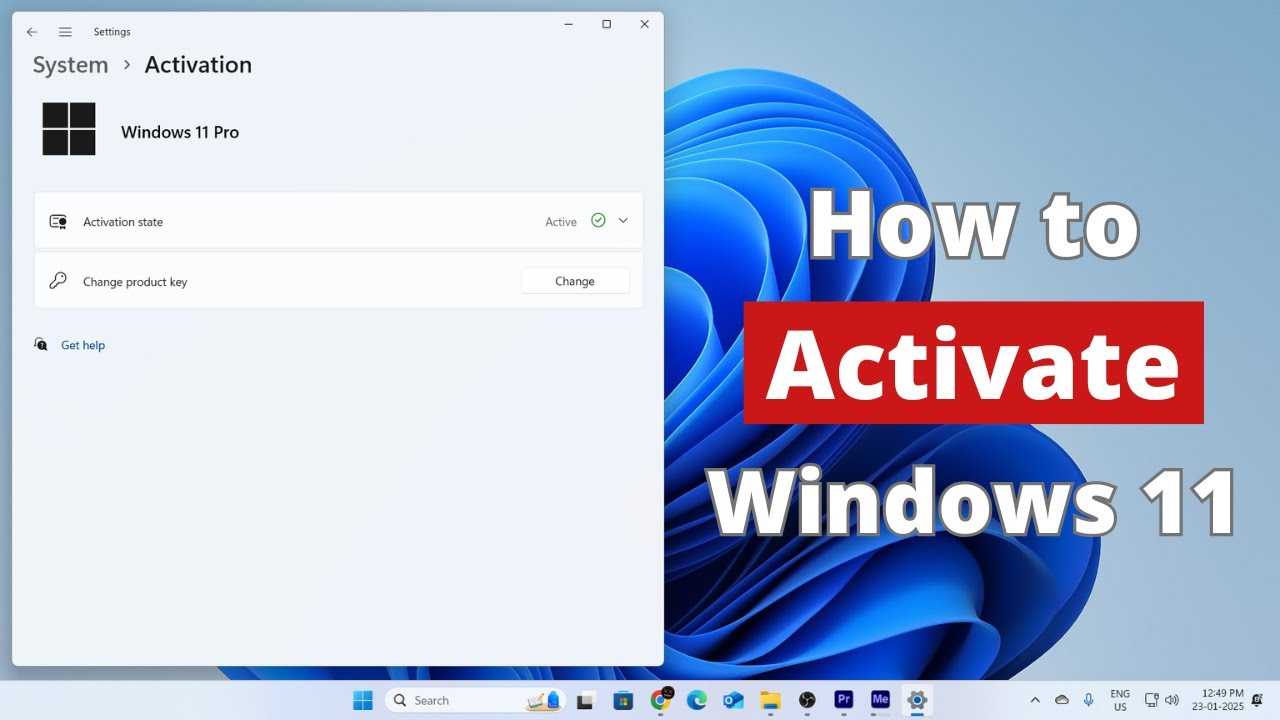
3. Access Settings
Click on the Start menu and open the Settings app. Navigate to the “System” option, then choose “About.” Here you can find system specifications and the activation status.
4. Enter the Product Key
Under the “Activation” section, click on “Change product key.” Enter the valid key you acquired and press Enter. The system will begin validating the key.
5. Complete the Activation Process
Once the key is accepted, follow any on-screen prompts to finalize the process. Ensure that your machine stays connected to the Internet for seamless activation.
6. Verify Activation Status
After completion, revisit the “Activation” settings to confirm that your operating system shows as activated. A message indicating activation status should appear.
Using this basic guide, you can efficiently set up your operating system for a high-performance experience tailored for your needs.
Another common issue is the incorrect entry of the activation key. Double-check the characters, especially those that can be easily confused such as “O” (letter) and “0” (number). If you’re using multiple devices, verify that the key has not exceeded its limit by checking the licensing terms associated with your software.
For users with a new custom-built setup, ensure that the motherboard is compatible with the operating system license you’ve acquired. Guidelines can often be found in specific forums or softwarekeep to help identify any compatibility concerns.
In some cases, Windows may not recognize previously activated systems due to hardware changes. If you have updated components recently, be prepared to go through the reactivation process, which may involve contacting support. Review top options for Windows activation for more assistance.
For detailed help, refer to the authoritative resources from Microsoft support, ensuring you have the most reliable information for troubleshooting activation challenges within the United States.
Applying these adjustments can lead to a more pleasant experience by keeping noise levels at a minimum while the system is operational. For software solutions to aid in the activation of the environment, visit SoftwareKeep for guidance.


