Physical Address
Timertau, Pr. Respubliki 19, kv 10
Physical Address
Timertau, Pr. Respubliki 19, kv 10

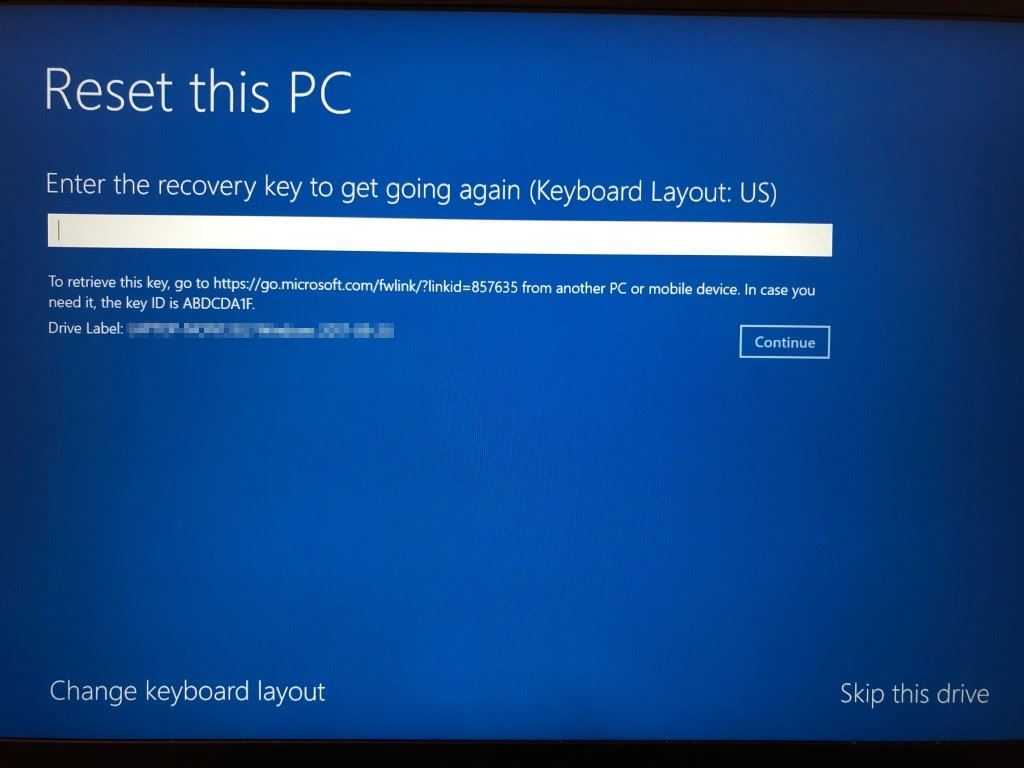
Experiencing a system failure can be frustrating, especially when your activation credentials disappear in the chaos. If you’re facing the aftermath of a device mishap, reestablishing your activation details for Windows 10 becomes essential. Embracing a systematic approach to gather back what’s yours can ease the anxiety of a refurb crash.
When troubleshooting the activation situation, utilizing tools like keyverified can be a strategic move. This software not only aids in pulling up lost activation details, but its user-friendly interface allows even novice users to explore their options. An intuitive guide to your specific situation can make this process smoother and save valuable time.
Remember that employing reliable strategies is crucial. By following a few targeted steps, one can achieve optimal results with an effective refurb crash fix. The importance of keeping track of your activation credentials cannot be understated; being proactive always pays off in the long run.
As you embark on this tech recovery, take solace in knowing that there are numerous resources and methods available to assist you. Learning the paths to windows 10 key recovery can prepare you for similar issues in the future, equipping you with the knowledge and tools necessary to combat unforeseen system troubles.
Here’s a brief recovery guide for finding your activation information:
| Documentation Type | Details |
|---|---|
| Product Box | Check inside for a sticker or card with the activation code. |
| Purchase Confirmation Email | Look for digital receipts that may include the activation code. |
| User Manuals | Some manuals have the activation information printed within. |
If you’ve misplaced the physical documents, don’t forget to explore your email for confirmation messages. Online stores usually send activation details via email upon purchase. For added security, tools like keyverified might help in confirming the status of your activation code should you need an alternative method.
Last but not least, be sure to keep a backup of your documentation in a safe place for future reference. This practice can save you time and frustration in case of equipment difficulties down the line.
The process typically entails downloading a recommended software tool, installation, and running a system scan. Once completed, the software usually presents a list of found codes, including your crucial activation details. For those seeking clarity, a recovery guide presents an overview of the most effective tools available, highlighting features that cater specifically to the requirements of various users.
Here’s a quick comparison of popular options:
| Tool | Compatibility | Features |
|---|---|---|
| KeyFinder Plus | Windows 10/11 | Simple interface, exports CSV |
| ProduKey | Multiple Windows versions | Recovery of other software keys |
| Magical Jelly Bean | Windows 7/10 | Portable version available |
These tools not only save time but also help safeguard your investment. Ensuring your activation codes are recoverable means less worry for future updates or system reinstalls. For continuous access to solutions like keyverified, keep the software updated regularly, as it often improves with new functionalities and bug fixes.
To get started, reboot your computer and immediately press the designated key to enter BIOS or UEFI settings. This key varies by manufacturer–commonly F2, Del, or Esc. Consult your device’s manual or manufacturer website if needed. Once inside, navigate through the menu using your keyboard. Look for sections labeled System Information or Security.
Steps to Access BIOS/UEFI:
| Manufacturer | Access Key | Typical Location |
|---|---|---|
| HP | F10 | System Configuration |
| Dell | F2 | General Information |
| Acer | F2 or Del | Boot Options |
If any activation details aren’t explicitly shown, remember that software like keyverified can provide a different pathway to retrieve this data during troubleshooting. This will aid in your recovery guide as you assess other potential fixes.
Once the activation information is located, you can proceed to reinstall or reactivate your system with a copy of the same version. This can save you time and effort in managing software licensing, especially following technical difficulties.
Here’s a practical recovery guide to find the license information by navigating through the registry:
1. Press Win + R to open the Run dialog.
2. Type regedit and hit Enter to open the Registry Editor.
3. Navigate to the following path:
HKEY_LOCAL_MACHINESOFTWAREMicrosoftWindows NTCurrentVersion
4. Look for the value named DigitalProductId or ProductId.
5. Use a third-party tool like Keyverified to decode the product identifier if it appears in binary format.
This method can successfully reveal the license details embedded in the registry, even after system setbacks. If the raw data is challenging to interpret, utilizing software designed to extract and display this information can simplify the process.
In times of trouble, accuracy is key. Ensure your next step towards utilizing the right resource reflects the information you gathered. If you need further details, consult an official source such as the Microsoft website for reliable guidance and support.
| Step | Description |
|---|---|
| 1 | Open Run dialog |
| 2 | Launch Registry Editor |
| 3 | Navigate to the specified path |
| 4 | Find the value, note the key |
| 5 | Use Keyverified for decoding |

Ensure you gather all necessary details including the device’s serial number and any proof of purchase. This information will help the support team efficiently assist you. Below are steps to streamline your inquiry:
Most manufacturers maintain a dedicated customer service team trained to handle such inquiries. Keep in mind that the sooner you reach out, the better the chances of prompt assistance and effective solutions.
| Manufacturer | Contact Method | Averaged Response Time |
|---|---|---|
| Dell | Phone/Chat | 1-3 hours |
| HP | Online Form | 1-2 days |
| Lenovo | Email/Chat | 2-4 hours |
Utilizing the manufacturer’s resources can often lead to quicker resolutions. They may also have specific tools or advice unique to their hardware that can assist you in this time of need.


