Physical Address
Timertau, Pr. Respubliki 19, kv 10
Physical Address
Timertau, Pr. Respubliki 19, kv 10

Streaming platforms are gaining momentum, particularly among the younger generation. Educational establishments, however, often impose restrictions on online activities, making access to specific services challenging. To maintain freedom of expression in this environment, utilizing a reliable virtual private network (VPN) is essential, allowing students to share their experiences without barriers.
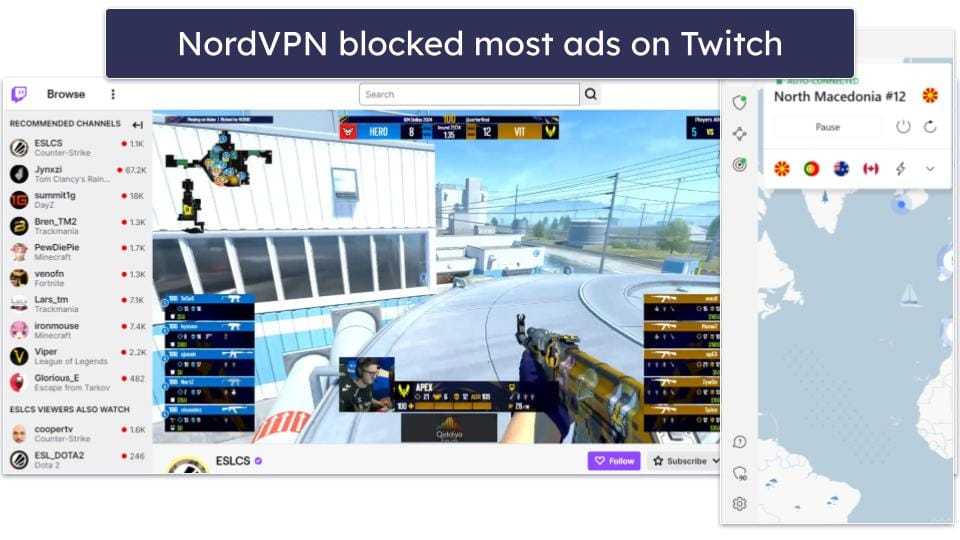
Implementing a twitch vpn offers an array of advantages. It encrypts internet traffic, ensuring that data remains confidential while bypassing any limitations set by network administrators. This is particularly beneficial in environments where user activities are closely monitored, ensuring privacy and protecting sensitive information from prying eyes.
To maximize efficiency during school broadcasting sessions, one must select a provider that delivers optimal performance. Consider examining connection speeds, server locations, and user experience ratings when making a choice. Keeping in mind the ever-growing demand for high-quality streaming, selecting a vpn solution that can handle multiple users simultaneously will significantly enhance the overall experience for both streamers and viewers alike.

Typically, a three-tier structure is common, each providing distinct features:
| Plan Type | Monthly Cost | Simultaneous Connections | Notable Features |
|---|---|---|---|
| Basic | $3.99 | 1 | Good for individual use |
| Standard | $4.99 | 6 | Ideal for small groups |
| Premium | $5.99 | 10 | Best for larger classes |
Assessing your engagement level on streaming platforms can guide you towards the suitable tier. For smaller clubs or groups, a standard plan usually suffices. However, larger classes with multiple creators benefit from premium options, allowing various simultaneous connections–essential for collaborative work.
Additionally, consider any educational discounts available. Many VPN services often extend special rates for schools and universities, which can ease financial burdens. Always check for promotional offers when signing up. A robust setup guide can further streamline the onboarding process, ensuring you maximize your investment right from the start.
Step 1: Device Compatibility Check
Before installation, verify that the devices meet the necessary hardware and operating system requirements for smooth functionality. Common supported systems include Windows, macOS, iOS, and Android. Ensuring compatibility minimizes potential connection issues later.
Step 2: Downloading the Application
Visit the official website of the chosen service and download the application suitable for your device. Ensure that you are downloading from the legitimate source to avoid malware risks.
Step 3: Installation Process
Launch the downloaded file and follow the on-screen instructions to install the application. Generally, the process is straightforward; however, administrative access may be required on school devices. Make adjustments within settings if necessary to accommodate installation.
Step 4: Configuration Settings
Once installed, open the application and create an account if prompted. Log in using your credentials. Adjust the settings for optimal performance, typically selecting streaming-optimized servers to enhance speed and reduce latency.
Step 5: Connection Testing
After setting up, ensure a reliable connection by testing the service. Launch a school streaming platform and check for buffering or interruptions. A successful connection will facilitate a smooth flow of educational content.
| Device Type | Supported OS | Recommended Server Settings |
|---|---|---|
| Windows | Windows 10, 11 | UDP, London Server |
| macOS | macOS Catalina or later | TCP, New York Server |
| iOS | iOS 12 and above | UDP, Washington Server |
| Android | Android 5.0 and up | UDP, San Francisco Server |
Utilizing a secure application enhances the safety of the broadcasting environment and opens up access to an entire realm of educational content. For official guidelines about internet safety in educational institutions, refer to the Common Sense Education.
1. Choose the Right Server Location:
Connect to a server geographically closer to your school or the audience. This minimizes latency and enhances data transfer speeds. For instance, if a school is in the UK and most viewers are also from there, select a UK endpoint.
2. Protocol Selection:
Utilize the WireGuard protocol if available. It’s known for high speeds and efficient performance, making it ideal for real-time activities like gaming or live video. Navigate to the settings and choose WireGuard from the list of protocols.
3. Enable Split Tunneling:
This feature allows certain applications, like broadcast software, to bypass the VPN while keeping other traffic secure. By doing this, you can reduce bandwidth usage and optimize streaming quality. Check the VPN settings for an option to manage split tunneling.
4. Use a High-Speed Connection:
A reliable internet connection should be prioritized. Speeds of at least 100 Mbps are recommended for seamless viewing. Consider conducting speed tests to ensure the chosen server does not bottleneck performance.
| Setting | Recommended Option |
|---|---|
| Server Location | Closest to Users |
| Protocol | WireGuard |
| Split Tunneling | Enabled |
| Minimum Speed | 100 Mbps |
By implementing these configurations, educators can provide a stable and engaging environment for students during online sessions. Additionally, ensuring minimal interruptions enhances the overall experience for participants involved in these interactive sessions.
Consider revisiting these settings before major streaming events to maintain optimal performance.
1. Conduct Speed Tests: Utilize reliable websites like Speedtest.net or Fast.com to gauge your upload and download speeds. These metrics are crucial to ensure your connection meets the requirements for quality broadcasting. A minimum upload speed of 3 Mbps is generally recommended, but higher is preferable for smooth streams.
2. Monitor Latency: Ping tests reveal how quickly data travels to and from your server. A latency under 50ms is ideal. You can use command prompt tools or online pings to check responsiveness. If latency exceeds 100ms, viewers are likely to experience delays, affecting engagement.
3. Assess Stability: Consistent speed is key. Run tests at multiple intervals during the day to determine if your connection fluctuates, especially during peak hours in school. Using a VPN may affect performance; thus, select a server geographically close to reduce possible lag.
4. Evaluate VPN Impact: Check streaming quality with and without the VPN. Ideally, the impact should be minimal, but if you notice significant slowdowns, consider switching servers or contacting support for optimised configurations that handle school streaming challenges.
| Test Type | Ideal Range | Tools |
|---|---|---|
| Download Speed | Above 5 Mbps | Speedtest.net |
| Upload Speed | Above 3 Mbps | Fast.com |
| Latency | Under 50 ms | Command Prompt |
| Connection Stability | Consistent speed | Multiple tests |
Testing your connection’s speed and stability is an ongoing process, especially in educational settings. Regular assessment ensures that technicalities do not hinder your performance during broadcasts. By implementing these checks, you position yourself for more seamless and engaging interactions with your audience.
A well-executed configuration enhances the overall experience while ensuring security. Follow this detailed setup guide:
| Feature | Benefit |
|---|---|
| Password Protection | Limits access to authorized viewers. |
| Waiting Rooms | Prevents unwanted disruptions. |
| Stream Delay | Allows for real-time content moderation. |
Craft content aware of the audience and educational goals. Consider the following:
Ensure a safe digital environment by adopting these protocols:
By implementing these targeted strategies, educators can create a secure and effective platform for classroom broadcasts, enhancing the educational experience while keeping students safeguarded. Don’t forget to monitor the evolving trends in online engagement as seen in events like Twitch 2025 for future enhancements.


