Physical Address
Timertau, Pr. Respubliki 19, kv 10
Physical Address
Timertau, Pr. Respubliki 19, kv 10

When engaging in a hardware refresh that involves extensive modifications, particularly in the case of refurbished components, users often encounter frustrating challenges related to software authentication. The process, commonly referred to as a refurb swap fix, demands a precise understanding of how software keys are tied to specific hardware configurations. This article aims to provide a streamlined recovery guide that will illuminate the steps necessary to validate your software setup after such changes.
Through a calculated approach, this guide will navigate you through solving the potential hiccups that may arise. With a focus on keyverified methods, we will break down the troubleshooting process into manageable tasks. This ensures that you can reinstall and reactivate necessary software with confidence, avoiding unnecessary roadblocks. Whether you are switching parts or upgrading systems, knowing the right steps can make all the difference.
In today’s fast-paced tech environment, maintaining access to your essential software resources is critical. By following the outlined strategies, you can effectively address any license-related issues that occur due to component alterations. Let’s delve into this comprehensive guide that aims to put you back in control of your digital environment.
Each activation method will require a different approach for license information assessment during your component exchange. To confirm your current activation type, follow these steps:
If you determine that a digital license is in play, it’s a good idea to link your Microsoft account if it’s not already associated. This enhances your chances to reinstate your access without hassle, especially in situations like component changes.
| Activation Method | Pros | Cons |
|---|---|---|
| Digital License | No need for a key; easier recovery associated with Microsoft account | Requires the original hardware to be recognized by the system |
| Product Key | Direct control; can be transferred if needed | Must be stored securely; vulnerability to loss |
| Volume Licensing | Cost-effective for multiple installations | Complex recovery; not always straightforward for end-users |
Identifying the correct activation approach will greatly ease the path towards your license recovery. Don’t forget to make a backup of information regarding your activated setup to avoid potential pitfalls down the line.
1. Enter BIOS/UEFI: Restart your machine and press the designated key (often Del, F2, or Esc) to access the BIOS or UEFI settings. Consult your motherboard manual for specifics.
2. Navigate to Security Settings: Within the firmware interface, look for a section labeled ‘Security’ or ‘System Information.’ This is where key details are typically displayed.
3. Locate System Product Key: Scan for any entries labeled ‘Windows Product Key’ or ‘OS License.’ If available, you’ll find the installation serial that corresponds to the active OS.
4. Record the Key: If you successfully find the installation key, jot it down securely for future reference. This is crucial for reactivating the operating system after any alterations.
This method is particularly reliable for devices preloaded with an operating system, ensuring continuity as you transition to new hardware specifications. Be sure to familiarize yourself with your firmware’s layout; the labeling and classification can vary significantly by manufacturer.
| Step | Description |
|---|---|
| 1 | Access BIOS/UEFI during startup |
| 2 | Navigate to Security or System Information |
| 3 | Locate Windows Product Key |
| 4 | Securely write down the Product Key |
If you encounter issues finding the key, consider utilizing third-party tools that may display system specifics directly from the operating system itself. Keyverified applications can extract the installation serial efficiently without navigating firmware.
Utilizing the BIOS or UEFI method ensures that you retain essential product information during significant alterations, facilitating a smoother transition into upgraded performance. For further assistance, refer to credible resources like the Microsoft support page or specific motherboard documentation.
Step 1: First, open the Command Prompt with administrative privileges. Click on the Start menu, type “cmd,” and right-click on the Command Prompt option that appears. Choose “Run as administrator” to ensure you have the necessary permissions.
Step 2: In the Command Prompt window that opens, type the following command and press Enter:
wmic path SoftwareLicensingService get OA3xOriginalProductKey
This command queries the Windows Management Instrumentation (WMI) to retrieve the product key stored in the BIOS or UEFI firmware of your machine.
Step 3: If you’ve successfully executed the command, the product key will appear right beneath the command. Keep this key safe, as it is essential for reactivating your system, especially after component changes.
In some cases, the command may not return a key if your system was upgraded from a previous version or if no key was embedded in the firmware. If this occurs, consider using third-party tools specifically designed for license retrieval. These applications can often recover product keys from the Windows Registry without needing additional steps.
For those who prefer a graphical interface, tools like Belarc Advisor or ProduKey can display all product keys associated with your system. However, ensure to download these from reputable sources to avoid malware risks.
For those facing issues, Microsoft’s official support page provides further insight into troubleshooting activation problems. Explore resources at Microsoft Support.
| Step | Action |
|---|---|
| 1 | Open Command Prompt as Administrator |
| 2 | Type command: wmic path SoftwareLicensingService get OA3xOriginalProductKey |
| 3 | Read the displayed product key |
Utilizing the Command Prompt for license retrieval is a practical approach for those managing system updates. Whether it’s for a system upgrade or troubleshooting existing activation issues, understanding these steps can streamline your experience while ensuring your setup remains secure and accessible.
First, gather essential information about your device. Microsoft Support will typically ask for details such as the type of device, your Microsoft account email, and any previous licensing information. Ensure that you’ve checked any documentation or correspondence related to your purchase, as this may expedite the process.
Next, utilize the official support website to initiate contact. You can choose from several options: live chat, phone support, or community forums. Live chat tends to be the most efficient for quick inquiries. Here’s a table comparing these options:
| Contact Method | Response Time | Best For |
|---|---|---|
| Live Chat | Immediate | Quick Questions |
| Phone Support | Variable | Complex Issues |
| Community Forums | Variable | General Advice |
During your interaction, be clear and concise. Explain your refurb swap fix, and detail the problem you’re facing with your license. If you have a product key or proof of purchase, be ready to share that information. Microsoft’s support team is equipped to assist and may provide you with a new license or resolve any discrepancies related to your account.
Lastly, if the direct approach fails, consider reaching out via social media channels like Twitter, where official support accounts often respond quickly to inquiries. This can be a helpful alternative if you’re not able to resolve your issue through traditional means.
Begin by ensuring your system is connected to the internet. Once you’ve powered up and logged in, you may encounter an activation issue. Head to the Settings menu, select Update & Security, then navigate to Activation. Here, you should see the option for reactivation.
If you’ve previously linked your online account to your operating system’s activation, click on Troubleshoot. This will guide you through identifying the problem and allow you to re-establish your digital rights for activation. If your details are tied to your Microsoft account, sign in to that account when prompted.
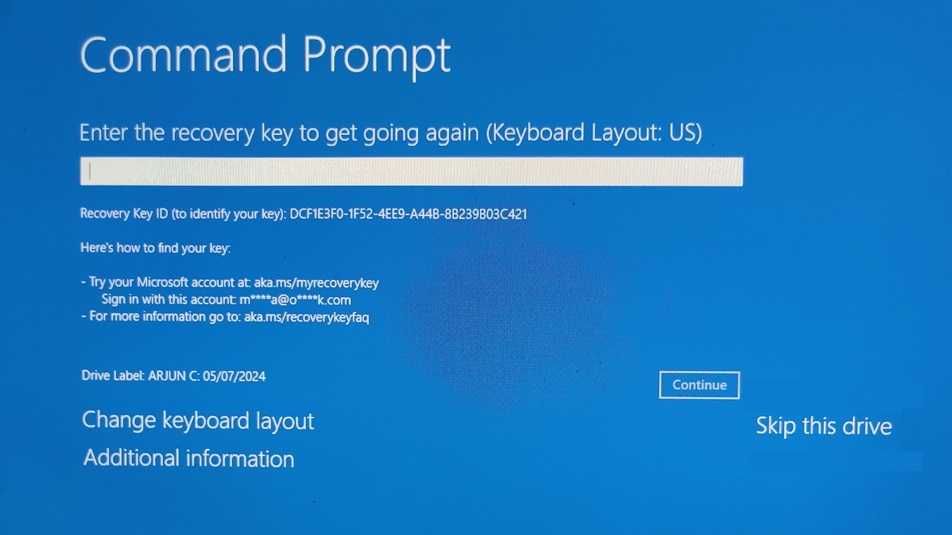
In the event that you’re not automatically reactivated, you can contribute the last five characters of the installation number to expedite the process. Sometimes, this quick step resolves activation errors seamlessly.
| Step | Action |
|---|---|
| 1 | Connect to the Internet |
| 2 | Open Settings > Update & Security > Activation |
| 3 | Click on Troubleshoot |
| 4 | Sign in to your Microsoft Account |
Additionally, if issues persist, consider using your product information for direct activation assistance via the phone. The activation pages offer options to reach out for help, ensuring you avoid unnecessary downtime.
Lastly, ensuring that your system runs the latest updates is crucial. Regular updates not only improve performance but may also resolve existing activation hurdles. Stay ahead by keeping your system updated, especially in light of the 24H2 refresh.


